
7.1: Introduction
In this module, you will get a completely new perspective on term deep cleaning. You will learn what it really takes to get a professional deep clean. One which involves you getting deep into an oven, disassemble it, rip it apart, and rebuild it to look like new. Not only will you learn the cleaning techniques to use, but also the order in which you should carry out the tasks for speed and efficiency. Starting from removing the door, the shelves, support racks and other removable parts to soak in your dip tank, and the cleaning order to follow while the chemicals do their work.
Despite time being required to leave cleaning paste working, and the dip tank solution breaking down the grime, there really is no need for you to stand around waiting. The more time you spend waiting around, the less money you make. That is why there's detailed cleaning guidance provided here for you to follow. From the different types of hobs, to cleaning the ovens themselves. The tricks of the trade...
You will learn the tricks of the trade to maximise efficiency while getting tremendously clean and beautiful sanitised finishes your customers will be in awe with. By the end of this module, you will know exactly how to remove the oven door, get the inside of double-tiered glass doors cleaned to a shine, and reassemble cookers to look completely rejuvenated. People are hiring you for a professional deep clean of their cooking appliances, and this is how you're going to meet and exceed your customer's expectations, every time! But up first...
Safety First - Power down
Before you do any cleaning on any appliances, be sure they are switched off at the mains. With the power running to the unit, you could accidentally knock a knob, turning it on when the chemicals are inside the oven causing noxious fumes to release.
Because you are going to be working with chemicals, you will need to make sure the room is well ventilated for safety reasons. Always open windows, and if there is a door in the kitchen, open that too.
7.2: The cleaning techniques to use
7.2a: Ceramic and Glass Hobs
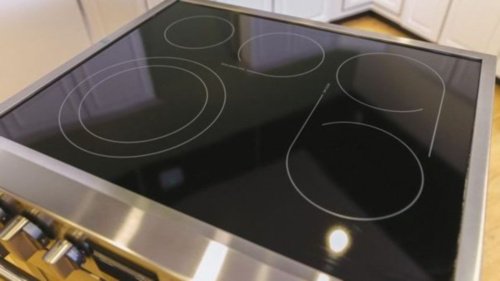
Ceramic and glass hobs look spectacular in modern kitchens, but they come with some baggage for the proud owners, who often have a dent in their confidence because of how poor their supposed to be beautiful ceramic or glass hob looks. Unless consistent care is taken with these surfaces, as in regular and frequent cleaning, and buffing, the surfaces can soon look tired quickly. One of the biggest problems homeowners face with these surfaces is fear. A fear that they will apply too much pressure to the surface, causing damage by scratching the enamel. These surfaces are easy to scratch, and there are very few hobs (if any) that are scratch resistant. Scouring pads are not the tool for the job and despite popular misconception; a plastic scraper is the right tool to get the job done. No matter how careful someone is with their cooker, there is always going to be some sort of food debris lands on the surface, and if it isn't removed quick enough... it becomes ingrained on the surface, becoming impossible for the owner to remove because they're too afraid to take a scraper to it. You need to be careful with this technique because of the fragile nature of ceramic and glass. Always remember these surfaces do scratch easily.This is the process for cleaning ceramic and glass hobs
1) Preparation
Before you do anything, you want to first get the surface prepared. Any loose debris is the first thing to remove. You only want to be working with stubborn stains and not using chemicals when they aren't required. Use tepid water and a smooth cloth first to wipe down the surface. The loose debris will come off easily. The only debris left should be the baked on parts left over from a spill, such as milk boiling over in the pan. Get rid of loose debris first and then...
Step 1: Prepare area
2) Scrape
Here's the tricky part that owners hate to even think about. Scraping glass or ceramic. There's a knack to this though. Use the scraper at a shallow angle so that the blade runs smoothly over the surface. You do not want the blade pointing down into the surface, but instead you should be gliding across it. If you've never scraped a surface like this before, then it is advised that you get some practice. Any type of glass will do to practice on. An old photo frame or a cheap mirror. If you've nothing lying around, then pick something up in your local pound store. The easiest way to get a substance to practice and master your scraping technique is to use wax from a candle. Burn a candle, and pour the melted wax onto the glass, or mirror and let it stick. Then your objective is to scrape it off without scratching the surface. Lay the surface flat, (as a ceramic hob will be), and as straight across the surface as you can get the scraper, is the angle you want to use. Do not point it into the surface, but angle it to glide across it. Use slow and smooth strokes in a forward direction.
After each forward stroke of the blade, lift it off the surface and go over it again in the same slow forward moving motion. You will find you're able to get the wax off without leaving scratches. That same technique will be used to scrape off stubborn debris from a ceramic hob. Imagine a customer calling you up after they have accidentally dropped a tea towel on a hot ceramic hob, and it's like a melted plastic stuck to it. If they don't know how to scrape the debris off, they'll be having fits thinking they're cooker is ruined. Or for around £15, you can save the cooker and restore it to looking like new. Just by using a scraper at the right angle to get all the debris removed, and then ready to shine it up.
Step 2: Scrape
3) Apply the cleaner
Once the debris is removed, a ceramic hob cleaner solution can be applied. You only need a small amount of cleaning fluid and only apply it to one section at a time. It's easier to clean one ring at a time than it is the entire hob.
Step 3: Apply cleaning product
4) Use the right cloth
As this surface is delicate, you cannot use anything abrasive. You need to use a non-scratching cleaning pad and work the solution in a circular motion. If you find there are marks that are stubborn to move, do not apply pressure that could risk damaging the surface. Instead, use newspaper as it has a rougher texture, but it's still smooth enough not to scratch the surface. Once the stubborn marks are loose, use a clean cloth, rinsed in some warm water to clean the surface.The last cloth you will use is the microfiber cloth, as that will dry the surface, and allow you to buff it to a shine.
Step4: Finishing touches
7.2b: Electric Hobs (hotplates)
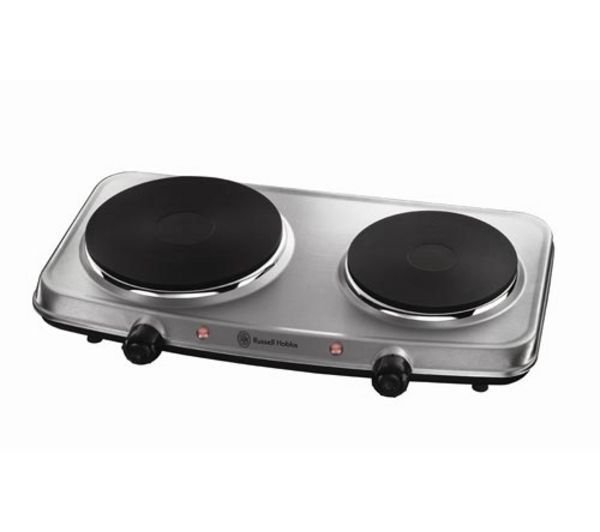
Electric hobs can be a nightmare to clean. Especially if pans have boiled over and stuck to the hotplate. These are the most difficult part of the hob to clean. Depending on the model, you may be able to remove the hot plate from the cooker, making cleaning so much easier. The reason it's easier when the plates are removed is because you are going to need to give these a really good scrubbing. Don't be afraid of damaging these as they are built really sturdy and can withstand a tremendous amount of pressure. Scouring pads will need to be used along with a strong de-greaser. Depending on the severity of dirt on the hot plate, you may find it easier to apply some cleaning paste onto the surface and leave it for 15 minutes before you begin scrubbing. For stubborn stains that won't shift, or are severely burned onto the plates, you might need to use steel wool.
The key to cleaning the hotplates is a good scrubbing with plenty of abrasion. Rough textured cleaning pads and a strong forceful scrub will get the plates clean. How long it takes really depends on the amount of pressure you can apply. The more the better. For the rest of the electric hob surface, you can apply any enamel cleaner, (cream cleaner) to the surface, and buff it dry with a microfiber cloth to finish it to a shine.
7.2 c: Gas hobs
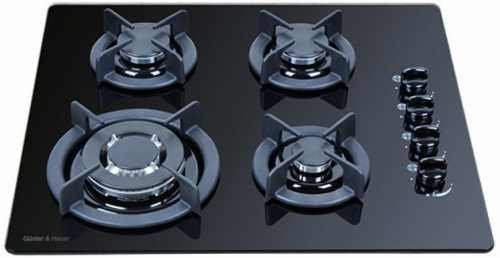
Gas hobs have plenty of removable parts and that's exactly where to start. By disassembling every removable part from the cooker. The burner rings and the pan supports will be removed from the appliance and placed in the dip tank, along with the racks, and shelving from
inside the oven. The only part you have to clean on the top surface is the enamel. Use the same method you'd use for cleaning glass and ceramic surfaces, because the enamel can be easily scratched if you use an abrasive solvent or a rough cleaning pad. The oven is going to be the most labour intensive job you will have to tackle. It will also be the dirtiest. Take all the removable parts on a gas cooker and place them in your dip tank, apply your heavy duty oven paste to the oven, and then get going with cleaning the enamel on the hob.
7.3: Oven Cleaning Process
Start by removing the door
The majority of modern ovens have easily removable doors. When you open the oven door, there will be a clip that you can simply pop up, and lift the oven door off. In older models, the doors may need unscrewed at the hinges, but you will find for the most part, that's it's just a clip at either side of the oven door that you can flick up and the door's ready to be lifted off the cooker. Lay a liner on the floor and lay the oven door flat on that for later. With the door removed, remove all the shelving and the shelves from inside the oven. These will be placed in the dip tank, while you're cleaning the rest of the cooker. If you're working with a gas cooker, you can also remove the pan supports, and gas burners to put in the dip tank for cleaning too.
Removing the door
Removing the shelves
Preparing the main cavity of the oven
The main part of the oven will need time for the chemicals to get to work and loosen the debris. Use your heavy duty cleaning paste for this by applying it to the base of the oven and the side panels. When applying the paste, you will need to avoid placing it near the pilot light in gas ovens and the heating elements in electric ovens. These will be cleaned with a damp cloth only and no chemicals. Be careful with spray bottles as these are capable of damaging delicate electrical, and gas components inside the oven cavity. For heavy duty oven cleaner paste, it will need left for a minimum of 15-minutes, however, not all brands are the same, so follow the directions for application and usage. As the paste does its thing in the oven, switch your attention back to the door.
Prepare the cavity
Cleaning the glass on the oven door Each model of cooker will be different, but the fixings are generally the same or at least not difficult
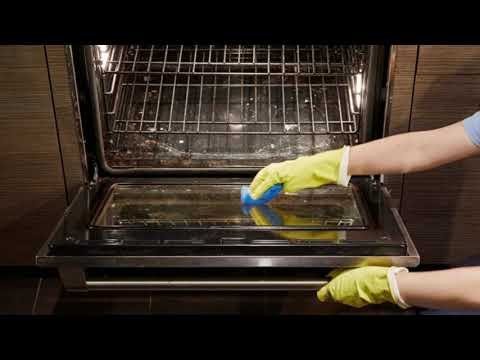
to figure out. There's only going to be a couple of screws, and those are for holding the glass in place. Remove the screws and then you're able to remove the glass. Just as the bottom of the door will have a clip to unlatch the door from the support frame, the door itself will have a couple of screws either side, holding the glass in place. Remove the screws from the side of the oven door, and you'll be able to remove the hinges from the bottom. They're generally only a few inches in length, but when you remove them, be sure you keep them in order. Keep the left hinge to the left, and the right on the right, so you know which side goes where when you're putting it back together. Oven doors can have as many as four pieces of glass. This is why people find it difficult to get their oven doors completely clean. Because they are only cleaning outer surfaces, and without removing the glass panes, they cannot clean between the glass panels. It stumbles many a person as to how the doors can be kept looking like new. It can only be done by taking it apart.
No matter how thorough or careful anyone is, there is always going to be dirt and grime accumulates between the glass panels. Without removing the panes of glass, it's impossible to get the inside of them clean. They must be removed but when you do, be sure to keep the glass panels in the order you take them out. The top must go on the top, so you will need to work in an organised fashion. The innermost piece of glass (the part that's always inside the oven) is going to be the heaviest stained. The dirt on the glass will be stubborn and difficult to shift. Use the same technique you'd use with a glass or a ceramic hob to get the glass clean by using the scraper. You may need to use a little bit extra power than you would with a hob, because the doors are not going to have been cleaned as regularly. The other glass panels will be able to be cleaned with a soft cloth and a spray of glass cleaner. With the glass cleaned, you're ready to put the door back together.
Remove screws to access glass
Cleaning the cavity of the oven
The time it's took you to clean the oven door will have given the heavy-duty oven cleaning paste plenty of time to loosen up the once rock solid debris from inside the oven. That's the power of the chemicals, but now comes the nasty part of the job. Cleaning out all that
gunk that's been lifted from the side panels, and the base of the main cavity. Before you get into this, get a bin liner ready because this is when you're going to be using your paper disposables. If you really want to save time and hassle messing around with paper rolls, you could use a load dispenser to house a bumper roll of tissue. Using the paper towels, simply wipe out the dirt and grime from the oven. One swipe will pick up a lot of thick grime, so you'll need plenty of tissue. All you're doing at this stage is removing the gunk that the oven cleaner paste has worked at loosening. This is the messiest part, so be sure you've a bin liner at the ready to put each piece of tissue into. Once you've removed the thick dirt from around the main oven, then it's onto the scrubbing part. The parts where the dirt is burnt onto the surface and needs a vigorous scrub to remove it. Use your scouring pad for this, along with some warm soapy water. There will still be some residue from the paste applied earlier in the process, so you cannot go spraying other chemicals as it will cause a chemical reaction to occur. That's why at this stage, it's only warm soapy water you're using to scrub the oven interior. Use your scouring pad and wet it a little, then apply good old fashioned elbow grease to the interior and give it a good scrubbing until you have the burnt parts removed.
Then use your paper towels again to wipe all the surfaces dry.
Clean the cavity
Cleaning the surrounding areas of the oven and hob Once you have the oven interior finished off, move onto the fascia and the knobs. The majority of control knobs can be removed, so take those out and clean the knobs and underneath before you put them back in place. If the knobs aren't removable, use an old toothbrush to get underneath them. The dip tank With the oven interior done, move onto the shelves and other parts that you have in your dip tank. Be sure that you change your safety gloves to the gauntlets because they are the only suitable gloves for working with your dip tank safely due to the temperature and the chemical solutions being used. Using a scouring brush, or your crimped wire brush; bring each part out the dip tank and give it a good scrub until you see it come up silver and dry them off with your paper towels. Use a microfiber cloth to give them a final buff and get them shining. Do that for each part you have in your tank, making sure you spend enough time to shine each part as much as possible. The scrubbing won't be difficult as the dip tank is designed to effectively break down the debris.
Return all parts to the kitchen and begin to put the cooker back together again. Wear a clean pair of disposable gloves at these final stages as the cleaning will be done, and you do not want to undo that by touching the surfaces with dirty gloves. Put the shelves and the supporting rails back into the oven and then put the door back on it. Putting the door back together You will need to work in reverse order to when you took the door apart. First putting the glass panes back in place, then putting the hinges back in place, and then securing the glass in place with each screw at either side. The ones you remove to get the glass out the door for cleaning. The door will then pop back onto the oven, and you'll need to flick the switch to lock the hinges in place and secure the door to the oven. Or if it's an older model, you'll need to work in reverse order to what you did to remove the door.
Put door and knobs back on
Turn your attention to the hob
If you're cleaning a gas cooker, you'll need to be sure that you put the correct gas burners in the right locations, as they are different sizes.
Before you put all the parts back in place, give the hob a final once over with a dry microfiber cloth to bring it up to a shine and then put the parts back onto the hob. The gas burners in the right spots, and then the pan supports. A final once over of the fascia will see the cooker fully cleaned
7.4: The Standards Expected of an Oven Cleaner
The first thing you need to remember is that nobody hires an oven cleaner expecting them to produce results that they can achieve themselves. They hire oven cleaners because they expect them to produce excellence, which is what you need to aim for every time.
As an oven cleaner, you need to try to think back to how great an oven looks and feels when it is new. If you have never experienced a new oven before, go see one, or think about how ovens are when you stay in self-catering apartments. While you won't be able to remove scratches or other signs of wear and tear for your clients, you can work on making sure they glimmer as much as possible. In order to achieve excellence, you need to plan your jobs carefully. Think about the methodical way you can approach different tasks. For example, when you are waiting for your oven dip tank to do its thing you can be working on applying that cleaning solutions to the oven itself. Doing this ensures you save time, allowing you to make more money and produce excellent results.
.svg)