
11.1 Introduction

Learning how to become handier with home decorating
and do-it- yourself (DIY) jobs will help you to completely
customise a home, apartment, or room for a client,
without them having to go through giant remodelling fees.
You do not exactly have to be an expert in the field, but there are steps you can take and should learn so that you can help a wider range of customers who are not looking for repair but are looking
to update their design.
some of the most common projects you will be called to complete, concerning
the indoors.
interior not only functions as a well put together
room but also establishes a feeling or mood, and shows off the unique personalities of the people within.
department and help wrap your mind around doing more than just home repair, the following guidelines
and directions will serve as a reference for you to always look back on.
Before You Start:Know this
Going with a handyperson instead of a certified professional can save the average consumer the extra pounds, but you should know the costs - a lot of time and a lot of sweat.
Before you even consider whether you can perform the task at hand, think about how much time they are giving you to complete
it, as well as whether
it is worth the investment or not.
You should also keep in mind that the professionals tend to get better pricing
when it comes to needed materials. So, whilst you might be saving the homeowner a lot on labour costs, you need to remain
upfront about the pricing of the required materials with them.
that are extremely
dangerous and pose a risk to yourself.
with the main electrical lines or natural
gas pipes should automatically go to a professional in the respective field. You do not want to accidentally cause an explosion
or a fire.
with these professionals, as you can recommend someone quickly. On top of that, you can both send work to the other.
Fact
It is imperative to plan out the positioning of whatever equipment you are using, so that you do not cause an obstruction to you or anyone else nearby. In the UK, 4,000 people visit hospitals
each year, following
the direct result of a fall caused by a paint bucket or spillage.
Source: Quittance.co.uk
11.2 Painting and Wallpapering
When it comes to adding unique décor to a wall, there are literally
thousands upon thousands
of different ideas and things that can be used.
When you are dealing with someone who wants to renovate but does not exactly know where to start or what they want, be sure to take the time to sit down with them and get to know them. Pick up on their certain mannerisms and sense of style. This will help you to better understand
what they want and can greatly help you in narrowing down the options to offer them.
In this section,
we are going to provide some steps regarding how to go about painting
or wallpapering.
11.3 Painting

The giant blank canvas of a wall can be a little intimidating, especially when you are planning to change it for anyone besides yourself.
Learn how to go about it the best way here, by following these simple, easy steps:
Preparation
The first step and key course of
action is preparation. When it comes to painting, it is natural to want to just
jump in and see the new colour on the walls. However, spending the extra time
preparing will leave you with much better results:-
either out of the room completely, or into the middle of the room with a heavy sheet covering it. The floor can get slippery; depending
on what type of material
it is, so be sure to use a canvas drop cloth to cover that as well.
a ceiling), you should shut off the radial circuit breakers to this specific room and set yourself up with a work lamp. Otherwise, you should still turn the circuit breaker off to uncover light switches and receptacle coverings.
old wallpaper may have to be removed. You can start by scoring the paper with a special wallpaper scoring
tool, using a circular motion to create perforations in the paper. Spray with a wallpaper
removing spray and then scrape off the paper with a putty knife. Any residue left can be gently scrubbed away with warm water.
Scrape off any old paint chips and be sure to patch up any holes in the wall.
Make sure the walls are completely clean, by vacuuming
off any dust or particles
in the nooks and baseboards.
Depending on the material of the wall and what the client is going for, you may need to prime the walls.
in the case of: bare drywall, bare wood, drastic
colour changing, high-gloss finishing paint, or stained/repaired areas.
there.
Plan
Painting a room, depending on the size, can take quite a few days to complete.
Plan ahead, so that you do not take on too many jobs immediately after and make sure the room you are working in has plenty of ventilation.
Paint from top to bottom. If painting
the ceiling, start with that, then the top halves of the walls and finish with the bottoms. Be sure to do one wall at a time.
Pour some paint into a small bucket, which you can bring up a ladder with you, together with a small brush for any detailed paintwork
along the edges
If you need to take a break, be sure to cover your bucket with a lid and any pans you are using with plastic wrap.
of paint on top of the thorough
rinsing, before also being hung to dry.
Activity 1
Estimated time: 10 minutes,
plus your drive to the paint store
At this time, you should head to your nearest paint store and stock up on the free palettes available,
which show all of the different colours you can create.
Having these on hand will allow you to show your client options when they say something like “blueish-green”, or do not have any clue at all as to what colour they think would enhance the room.
They are all free and are a great addition
to your tools as a handyperson.
11.4 Wallpapering
When it comes to wallpapering a room, you will need to prepare it, similarly to when you are preparing to paint.
The sheets of paper need to be pressed down smoothly and any chips or bumps in the wall will be noticeable or may even tear the paper. As always, cut electricity to the room whenever you get near light switches
or receptacles and be sure to drain any radiator
before removing it.
Once the room is prepped,
follow these steps:
* Hang the first sheet: Using a level, draw a straight
line from the ceiling to the floor with a pencil, down the wall you are beginning with.![]()
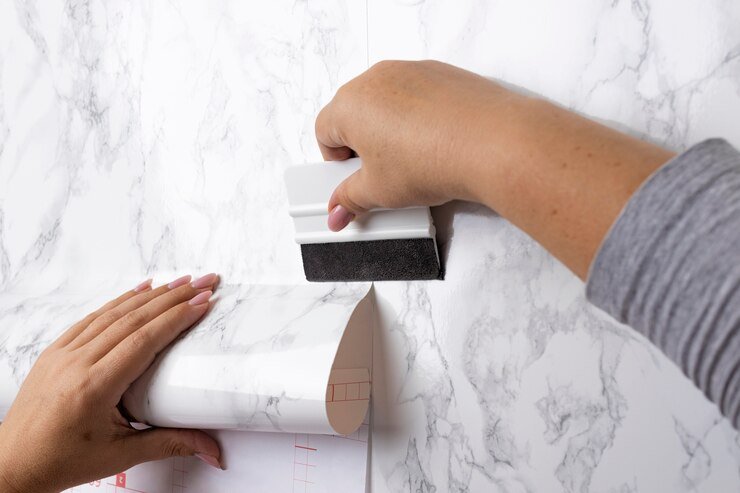
*Unfold the top section of your “book” of chosen paper and position
it against your guideline. When you are satisfied that it is level, brush the paper from the top down, creasing it into the junction, whilst also being sure that the vertical
edge is precisely aligned with your guide.![]()
*Unroll the book as you brush down all the way to the floor or baseboard, ensuring
you do not crease or tear the paper and always checking that it is still completely vertical.![]()
*Using your brush, go back up the paper to ensure proper adhesion.
Remove any air bubbles by gently working them to the edges.![]()
*When you go to add the next sheet next to the first, make sure that you match up any pattern
so that once applied, the pieces are unidentifiable as separated. Align the seams, using the edge of the previous
piece as your new guide for the next - and so on.![]()
* When you reach a window, hang the paper over the recess so that it overlaps, before you decide to trim. Make a horizontal cut and bend the extra flap into the recess. Any excess from here can then be trimmed away. The same applies when you reach a door.![]()
* For your final piece of paper, now that you have circled the entire room (if applicable), measure from the edge of your second-to-last piece to the beginning of the first. Cut out the final strip, measured
to these lengths, whilst also adding just a bit extra. Match it against the first strip of paper that you hung. Smooth out the ends and add more paste, if needed. The last two edges may not match up perfectly, but if you placed that part into the corner part of two walls, it is hardly even noticed.![]()
11.5 Hanging Projects
Hanging with a Level
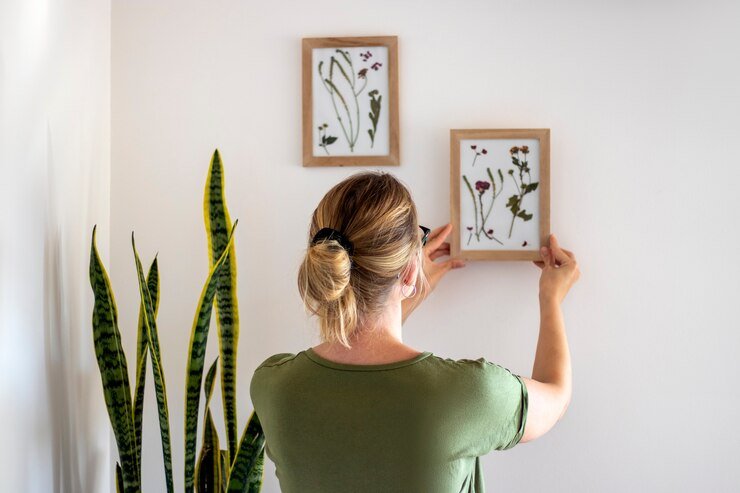
*You may get a call from a client whose request is simply just to hang something on a wall for them. A lot of people have a hard time hanging a shelf or frame straight
and efficiently.
*Most experts recommend hanging frames or shelves at eye level.
*Start there and have the client review this, before you proceed to put it up. They may want you to raise it or lower it, depending on their own height and desires.
*When hanging a group of shelves or pictures, a laser level is ideal, because you can align one photo with another one far away, without having to stop and check with your regular level
*Take extra caution, when hanging anything
heavy like a big mirror.
*Any hanging wires on heavy objects like this should be ignored and instead,
you should use D-rings to secure the frame of it onto the wall. Wherever you and the client agree on where to hang the object, make sure to mark the spot with a dark pencil.
Fact
Safety
glasses should always be worn, even if you think the project you are working on, such as installing curtain tracks, is minuscule.Thousands of eye accidents in the UK happen at work and whilst a lot are minor, 10 to 20% of them have resulted in partial or complete blindness.
Source: Safeworkers.co.uk
Hanging a Flat Screen
There are many different types of flat screen wall mounts nowadays,
but the basic makeup of each is typically the same
Certain
steps need to be taken, no matter which kind you are using:
*With the use of a stud finder, locate the two studs that will fall within the outline of the television. Mark the outside edges of each stud and then the centre.![]()
*Using a level, ensure the mount is aligned evenly on the wall and then create the pilot holes with a drill.![]()
*Attach the mount to the wall, using the included hardware.
You may come across someone
who found a mount or was given one without
any of the hardware. You can determine
what you need by researching the brand or even taking it to a nearby hardware store.![]()
Hanging Curtain Tracks and Drapes
Depending on the types of drapes you are installing, you may need to put a curtain
track in. There are
many different types, all with their own set of installation instructions. Most
methods are very similar and very easy to complete.
You will need to perform the same steps for each one:
The track needs to be just above the window recess, although you can position
it higher or lower, depending
on the needs of your client. Ideally,
however, it should be midway between the window and the ceiling.
Mark a line at the right measurement and then make measurements for the track brackets. To ensure your line is level, use a laser level, or run a string through
nails at the measurements and test it with a regular level.![]()
![]() *Before fitting the brackets,
*Before fitting the brackets,
lay out a dust sheet across the floor, to save for a lot of cleaning
afterwards. Starting at one side, hold one bracket to the centre of the mark.
![]() *Drill your holes for the bracket using a bit large enough for the plugs you will be inserting
*Drill your holes for the bracket using a bit large enough for the plugs you will be inserting
into the wall. Tap your plugs into place with a hammer, ensuring that you get them flush with the wall and then screw the bracket into place. Do not overly tighten,
as this will lead to quicker wear and tear down the line. They only need to be secure enough to hold the bracket
in place.
![]() *Once all brackets are put in place, you can then fit the curtain track. It may rest on the brackets, or it may need to be secured. Screw through the track and make sure the screw is flush against the bracket and not visible.
*Once all brackets are put in place, you can then fit the curtain track. It may rest on the brackets, or it may need to be secured. Screw through the track and make sure the screw is flush against the bracket and not visible.
You can then hang the drapes on the curtain
track.
Activity
2
Estimated time: 10 minutes
You should use the next couple of sections to hang a
television mount, as
well as curtain
tracks. Many clients
will call upon a handyperson to do this for them, so any experience putting them up will benefit
you
We recommend you get a mount and/or curtain tracks that are known to be a little more complicated to install than simple ones. Doing this can introduce
you to certain unfamiliar hardware,
or occurrences that you would not typically
encounter with the simpler ones.
More work with ones that are complicated will make installing
the easier ones a complete
breeze. As with any project,
be sure to don yourself
with the correct safety gear before you begin.
11.6 Common Projects
This section
will cover a variety of basic projects
you will encounter in
the UK.
We will go over the basic steps of each, but it is important
to keep in mind that you will probably have additional steps to follow, according to the installation instructions that come with each.
Installing a Cat Flat
It is important
to know where to place the cat flap from the ground, by measuring
the client's cat from floor to belly.
Install as follows:
![]() *Mark the measurement on the door or wall, where the flap is to be installed.
*Mark the measurement on the door or wall, where the flap is to be installed.
![]() *Using this mark, draw a square the size of the flap on the wall and then drill holes at each corner.
*Using this mark, draw a square the size of the flap on the wall and then drill holes at each corner.
![]() *Cut along the lines with either a keyhole saw or jigsaw. Smooth out the edges.
*Cut along the lines with either a keyhole saw or jigsaw. Smooth out the edges.
![]() *Place the cat flap into the hole and mark the needed screw holes with a pencil.
*Place the cat flap into the hole and mark the needed screw holes with a pencil.
![]() *Remove the flap and drill the holes with the correctly
*Remove the flap and drill the holes with the correctly
sized drill bit.
![]() *Screw the flap into place and if needed, file the screws down to size and ensure there are no sharp
*Screw the flap into place and if needed, file the screws down to size and ensure there are no sharp
edges.
![]() *Cover the screws with blanking plugs that are usually supplied
*Cover the screws with blanking plugs that are usually supplied
with the flap, to ensure a clean finish.
Basic Installation of New Tiles
A precise, clean installation of tiles is much easier than it looks.
With preparedness, the right
plan and our step-by-step process, you can very easily add this into your skills as a handyperson:
![]() *Make sure the surfaces
*Make sure the surfaces
are clean, dry and smooth,
for the best tiling results.
Patch and repair and then level off any damaged areas. Take away any moulding, trim, or appliances
that might interfere
with your work. Also, check the placement
of the doorjambs and ensure that there will be enough room to completely
open the door once the tiles are installed.
![]() *Mark the centre point of each of the walls in the room. Taking chalk, draw a line across the room to connect
*Mark the centre point of each of the walls in the room. Taking chalk, draw a line across the room to connect
each of these centre marks with their opposite, so that you can find the exact centre point of the room. At this centre, lay a row of loose tiles along both directions with the use of tile spacers, to create a nice, even layout. Upon reaching the walls, you will need to cut the tiles for a proper fit.
![]() *Mix enough adhesive at a time to use within 30 minutes. Using a trowel recommended on the package,
*Mix enough adhesive at a time to use within 30 minutes. Using a trowel recommended on the package,
as well as the recommended amount of adhesive,
spread a coat on the surface of one grid, without covering your guides.
![]() *Comb excessive
*Comb excessive
adhesive into the ridges between
tiles, leaving a uniform, rigid pattern of properly placed tiles. You can now completely install
the tiles into your grid.
![]() *Again, start at the centre of the room and finish each grid, before beginning
*Again, start at the centre of the room and finish each grid, before beginning
the next. Avoid sliding the tiles and set them in place one by one, with a slight twisting motion.
![]() *Once a grid is completely in place, tap all of the tiles into place with a hammer or mallet and wooden block. Use a putty knife to remove any excess adhesive that pushes back up.
*Once a grid is completely in place, tap all of the tiles into place with a hammer or mallet and wooden block. Use a putty knife to remove any excess adhesive that pushes back up.
![]() *Allow the work to settle for at least 24 hours, before walking on it.
*Allow the work to settle for at least 24 hours, before walking on it.
11.7 Skirting and Coving
![]()
Coving
and skirting can be a great feature to any room. These are the decorative boards in the corners where ceilings meet the walls and the baseboards.
You should measure the walls, to determine
how much length of the coving and/or skirting you will need. The skirting's
length should omit any doorways
or gaps in the walls.
It comes in a range of materials
and designs, so be sure to discuss with your client what they want. You do not want to assume, only to have to replace pieces they do not agree with.
Remove any loose wallpaper or flaky paint, before installing
the coving or skirting.
Then follow these steps:
![]() *Whether it be skirting
*Whether it be skirting
or coving, mark the wall or ceiling for the top and bottom of the material
in different sections,
then connect them all with a straight line.
![]() *Use coving adhesive to spread out onto the back of the pieces, then stick them against the wall or ceiling,
*Use coving adhesive to spread out onto the back of the pieces, then stick them against the wall or ceiling,
following your guidelines. Firmly press.
![]() *For quicker work, you can screw the coving in place whilst the adhesive sets, then unscrew
*For quicker work, you can screw the coving in place whilst the adhesive sets, then unscrew
once settled and patch the gaps.
Room Insulation
Most people spend the majority
of their lives at home, so it makes sense that they want it to feel as comfortable as possible, as well as affordable to maintain. In order to make that affordability a reality, the home needs to be bundled properly,
just as you need to bundle up on a chilly day. Proper insulation in the home also keeps the hot air outside
and the cool air inside,
during the warmer months.
There are many different types of walls you may be asked to insulate,
but for now, we are just going to talk about a basic, finished wall with a loose fill.
You should first drill a hole into the wall near the floor, large enough for the insulation blower to fit into. Ensure there are no electrical obstructions.
Fill the blower's bin with the loose-fill
insulation, insert the tube into the wall and blow the insulation inside.
When all bays of the wall are filled, patch the hole and reapply a building material to secure the wall.
Plasterboard Repairs
There are a variety of issues that can arise with plasterboard, so we will keep this section loose and simple.
You should remember a few basics:
![]() *When repairing
*When repairing
a hole in plasterboard, you will need to first enlarge it enough to create a square.
![]() *Cut a patch and fix it inside the hole with a suitable
*Cut a patch and fix it inside the hole with a suitable
adhesive.
![]() *Use a screw to hold the patch in place whilst the adhesive
*Use a screw to hold the patch in place whilst the adhesive
sets, fill that hole once done and complete the job by sanding the area flush with the rest of the wall and repainting.
Flatpack Assembly
Flatpack furniture consists
of the pieces being packaged
in pieces that can be flattened in a box for easy transport and then assembled
by the buyer. If you have ever dealt with this type of furniture
assembly and know how frustrating the directions can sometimes be, you can understand why your handyperson jobs may include
assembling some flatpack
furniture for clients.
the directions), you can typically
find videos online of someone
else assembling the same pieces.Before you get going, make sure you have plenty of room - and you may even want to take a friend to help you
This can help grant you an additional head to help you figure out the nonsensical directions, as well as help you hold things in place whilst doing the work. You will probably be on the floor, crawling
around a lot, so be sure to wear loose-fitting, comfortable clothing.
Module Summary
This model covered
a wide range of different
handyperson projects that you maybe never thought
you would be dealing with.
Handyperson work goes beyond electrical and plumbing work and can involve simple, decorating- type tasks.
By now, you should have an excellent
grasp of the basics of a lot of the projects you will encounter.
Practice makes all the difference, so make sure you carry out those activities and conduct further research if confused!
.svg)