
6.1 Introduction
.jpg)
The previous module covered some of the common fibres and textiles that are utilised in the fashion industry. As you become more familiar with these materials, you will begin selecting them for use in your designs and eventually, an entire fashion line. This module will focus on the textile skills you previously learned and teach you how to source materials for production. One thing every fashion designer should have in their back pocket is a reliable strategy for fabric sourcing. Thus, this module was written to teach you some essential steps you need to keep in mind when developing your strategy.
Once you have developed these skills, you will need to learn some basic skills, including pattern making, sizing, and grading, which are also outlined in this module. Also, you will learn the importance of fabric and trim storyboards and how to assemble your own. Although you can always outsource manufacturers to design your clothing, it is important that you know and understand every stage in the process of design. As you prepare to make your mark in the fashion industry, learning and understanding basic design skills is a critical part of developing your style.
6.2 Sourcing Materials and Contractors

Earlier in the course, you learned about fashion forecasting, so you should have a firm grasp on how to preview what will be available to you before each fashion season begins. During this critical phase, you should have also previewed the hottest fabrics and trims to give you a good idea of what you want to use and order for your line. Once you reached the range planning portion of fashion design, you may have noticed that your products and suppliers change frequently. The reason for this is the competitive nature of the fashion industry.
So, to understand how to efficiently source the materials, fabrics, and trims you will be using in your fashions, there are a few important things you should commit to memory. Since every garment begins with fabric, you should consider fabric selection and sourcing a critical step that can either make or break your design. This can also be an overwhelming phase for designers, so to help keep things in order let's first look at where your fabric comes from.
Textile Producers
When you choose to source fabrics from a textile mill, you are purchasing materials directly from the source. A textile mill weaves or knits the fabrics directly in-house, then sells it to wholesalers, textile agents, or manufacturers.
Converters
A converter will source printing plants and fabric mills for unfinished materials or greige goods, then convert them into finished fabrics. The converter outsources contractors for printing, dyeing, and other processes. They also work closely with manufacturers and other retailers who are up against short lead times.
Importers
Often, designers will import fabrics from other countries. In this case, they are ordered on indent, which means they are made in advance. The lead time for imported fabrics is generally 12-16 weeks to accommodate the overseas manufacturing cycle. There are several major fashion importers worldwide including the United Kingdom, US, and Asia.
Agents
An agent works as a representative of the textile manufacturer and wholesaler. They sell fabrics on commission but do not sell any stock.
Stockist Wholesaler
If you choose to source through a stockist wholesaler, you are selecting a convenient supplier with a short lead time and a ready supply of fabric. Stockist wholesalers purchase finished product from manufacturers, then carry the stock, which is then sold to retailers and manufacturers.
Jobbers
Although designers try their best to avoid wasting fabric, some excess material is unavoidable. Disposable agents are known as a 'jobbers', and they will come in and purchase any excess materials at up to 75 percent off. The designer can then source the fabrics at a discounted rate. Now that you know the different sources available to you, it might seem like all you have to do is order fabric and wait. However, before you choose to do business with anyone, you need to ensure that you run through these questions and include the answers in your sourcing strategy.
Lead Time
To make sure that everything runs according to plan, always ask your fabric manufacturer about production and delivery lead time. Depending on the amount of material you order and the type, you might need to allow several weeks for processing.
Minimum Quantities
When you are first starting out in the fashion industry, you might run across suppliers who require a minimum order quantity. In this instance You will have to guarantee an order for a few hundred yards of fabric, which might not be possible as an emerging designer. If this occurs, you can outsource cheaper materials from a supplier with lower minimums, but it is important to ensure you check quantities before purchasing.
Fabric Width
Before you order fabric, always make sure that you check the width to ensure that the pricing is based on length, not width. Many people will assume that all fabric is the standard width, but some handwoven and wholesale fabrics are wider.
Repeat Orders
Another important thing to consider is if your fabric will continue to be in stock once you mass produce. Make sure you discuss stock availability in advance before ordering anything with a supplier.
Pricing
Always shop all of your sourcing options and take into account your whole profit margin. Remember it never hurts to ask, so find out if the supplier offers tiered or wholesale pricing.
Sustainability and Ethical Policy
As an emerging designer in the fashion industry, it is up to you if you want to select a supplier who chooses sustainable materials or processing methods. However, it is becoming increasingly popular amongst consumers, manufacturers, and designers, and it is something you might want to consider as you source suppliers.
Many suppliers are becoming more transparent with ethical policies and standards regarding materials they choose to use and what they represent. Since you are creating a design that represents you, it is your responsibility to be aware of what is going on at every stage.
For example
If you find yourself selecting a supplier who turns a blind eye to the unethical treatment of cotton growers, it might reflect poorly on your designs.
6.3 Finding Suppliers

If you want to ensure that your designs reach full production, it is important to ensure you are sourcing fabrics from reliable suppliers who can guarantee the stock that you require. The first place you should begin searching for reliable suppliers is online because it is convenient
and will provide you plenty of details.
A few helpful resources in the UK that you might consider are:
thelondontextilefair.co.uk
whaleys-bradford.ltd.uk
fabricuk.com. Trade Shows
After you have researched the internet and located what is available, you might still want to explore other options available to you. There are several notable trade shows in the United Kingdom that you can visit for sourcing, including the Textile Forum, Premiere Vision and The London Textile Fair. Trade shows are a favourite amongst up and coming fashion designers because they allow you to research fabrics, order samples, and shop fabric businesses.
Activity 1
Estimated Time: 25-30 minutes
Take some time to review what you have learned and consider how the suppliers fit within your personal career goals. Next, choose the method that suits your design needs best and research the supplier closest to you.
You might choose to enter fashion retail, which means you have a short lead time. The best choice for you would be to choose a converter who can keep up with your pace. Follow that same example but apply it to your own career goals. Which supplier did you choose to outsource your fabrics to and why?
You should also consider the ethical and sustainable policy of any fabric supplier you work with. Is there anything else that you should consider when your name and brand is entrusted in the hands of other companies? Take some time to explore the idea.
6.4 Fabric and Trim Storyboards

After you have selected a supplier that is suitable for your needs, you will compile a fabric and trim storyboard. A storyboard is a similar concept to your mood board; only you will be recording information about the trims and fabrics that you have chosen for each garment in your collection. It might seem confusing to add another board to the design process, but just think of this step as a way to organise the many different swatches, trims, and materials that you have chosen for your garments.
You can create your fabric and trim storyboard using a physical or digital approach, but a physical approach is usually more effective because you can include swatches of each fabric and trim. After you have chosen your approach and compiled your fabrics you can begin your storyboard.
You should include the following information:
Fabric Style - An example of a fabric style might be summer print, black and white check, or chevron pattern.
Article Number - The article number will vary depending on the material or fabric you are using, and your supplier assigns this number.
Colours Chosen - When you were envisioning your design and placing colours on your mood board, you selected a colour story. This is most likely the theme that you have chosen for your collection, which is what you will indicate on your fabric storyboard.
Fibre Content - The fibre content could include cotton, rayon, polyester, or any other natural, or synthetic material you chose to work with.
Care Instructions - In this section, you will indicate specific care instructions for your fabric, and this will vary depending on the fabric and fibres you selected. Perhaps you might leave hand washing instructions on a rayon fabric.
Width - In this section, you will note the width of the fabric.
Price per metre - The last thing indicated in the fabric storyboard is the price per metre.
Fact
The London Textile Fair is the UK's premier platform for fashion fabrics and clothing accessories. TLTF provides manufacturers and their agents with the opportunity to showcase their products to the most influential buyers and designers on the UK fashion scene.
Source: thelondontextilefair.co.uk
6.5 Pattern making for Fashion Design

After you have sourced your fabric supplier and ordered your material, you can begin cutting patterns for your designs. In fashion design, a pattern acts as a template where parts of your garment are traced on. As an emerging designer, you will need to have a basic knowledge of pattern making and sewing. To begin, you should gather the essential tools and equipment necessary for the job.
Pattern Cutting Tools and Equipment
Before you start cutting patterns for design, you should ensure that you have all your tools in tow.
The following pattern making tools will be required:
#17 dressmaker silk straight pins
A pincushion or magnetic wrist straight pin holder
Paper and fabric scissors
Mechanical pencil and sharpener with #4-H lead for patterns
Blue and red coloured pencils to identify pattern changes
Green, red, black, and blue felt-tip pens to record pattern information
1⁄2 inch x 12-inch βlex general ruler
36-inch ruler
18 x 2-inch plastic ruler
24 x 14-inch metal tailor's square ruler
Triangle ruler with measurements to square lines
Ringers or hanger hooks
Push pins
Stapler and staple remover
Scotch tape
Black twill tape
Notcher
Tracing wheels
Awl
Metal weights
60-inch long measuring tape
Tailor's chalk
Simβlex folding measure
Basic Maths Skills
While you were gathering your tools, you may have noticed that there were several different rulers, which you will need for measuring your patterns. In the fashion industry, you will find yourself reading measurements often, so it is important that you have sufficient maths skills. If you don't, then you should practise, so you are ready when it comes time to work with rulers, measuring tapes, percentages, and fractions. Keep in mind that every phase of production in fashion design will rely on some maths.
You should therefore be able to perform the following essential skills:
Take measurements and record them up to 1/16th of an inch
Calculate yardage for single and mass-produce garments
Provide detailed measurements on spec sheets for garments
Apply maths instructions to a developing project from a worksheet
Pattern Paper
Now that you have gathered your tools and equipment, you should collect your pattern paper, which varies in weight from thick to thin.
Pattern paper weight is differentiated with the following code characteristics:
Heavyweight pattern paper - This is a tag bound paper primarily used for production patterns. A heavyweight pattern paper will have a weight code granite tag of (.007) to 5X.
Lightweight pattern paper - Weight code - one to five double duty marking paper. This pattern paper is a lightweight marking paper, which is used for making markers and developing first patterns.
Colour-coded paper - This pattern paper has two functions; it indicates right side up of pattern pieces or indicates the design division to which the pattern belongs.
The Pattern
At this point in the process, you are ready to cut your pattern, which will come from your sketches that were inspired by your mood board. As you can see, everything is unfolding in stages and coming together to form one unified collection. You can cut your own pattern, hire a pattern cutter, or you can even choose to enter the field as a pattern cutter, but for now, you should know and be familiar with how to cut your own design patterns.
Your pattern will begin as a three-dimensional garment, which is seamed together to create one piece. Every pattern piece contains points or notches that will correspond with adjoining pattern pieces that will accurately depict seam lines on your garment. Your pieces will need to fit together precisely.
Marking the Block
The first step in pattern cutting involves translating your design sketch to a pattern, then marking your block. This simply means you are beginning with a basic bodice block, which shows horizontal lines of the waist, bust, and hip lines. Parts of the block should be punched or notched to indicate where fabric should be attached. Next, you add the seam allowance, which will vary in size depending on the neckline.
Dart Manipulation
Darts will control any extra fabric and help create the shape of your garment. They are also the most flexible and creative part of pattern cutting.
For example
A dart can be used to make a style line, pleat, or to gather fabric.
Slash and Spread
Another technique you can add when cutting patterns is the slash and spread. With the addition of slash lines that reach one end of the platform to the next, this technique adds volume and flare.
Sleeves
One critical area of pattern cutting is sleeve construction, which you can choose to add to the bodice or set inside of it. You can choose the set-in sleeve, which is the most basic selection, or a two-piece, or laid-on sleeve.
6.6 Sizing, Grading and Measurements
While you are cutting patterns, and preparing to drape and βit them for final design, one important thing you need to know and understand is sizing. In the design phases, you may have been inspired to create a distinct style for a specific body type. However, if you are styling for a broad audience, you will need to prepare sizing for mass production. It is important to understand how to size and measure properly once you reach this stage of production.
Sizing
The first thing that you must remember is that women and men are not sized the same, so if you are designing for both markets, always keep that in mind. A woman's size is based upon measurements of her bust, height, hips, and waist. Another thing to remember is that sizing differs depending on location.
For example
Sizing in the United Kingdom begins at a size six and goes up to a size 22, while American sizes range from a two to a 14, in general. Menswear sizing is based on a measurement of his chest to fit a jacket, a waist and inside leg for trousers, and a neck sizing for shirts.
Finally, children's clothing is measured based upon height. To help you along the way, you can obtain a pattern cutting book for handy measurements on each size.
Grading
Grading is a specialised area in pattern cutting that involves scaling a pattern to a different size by increasing points of the pattern according to measurements on the British standard sizing chart. These increments can vary from three to five centimetres, depending on the garment. There are a few factors that will affect grading, such as lifestyle changes, which is why the British standard sizing chart has changed over the years to accommodate the average body shape. Another important thing to note is the varying body types in different areas.
For example
European body shapes are usually tall and bigger, while in the Far East, you will find the average shape is short and slim. After considering all those factors, make sure all your seams, notches, and punch marks match before grading your pattern.
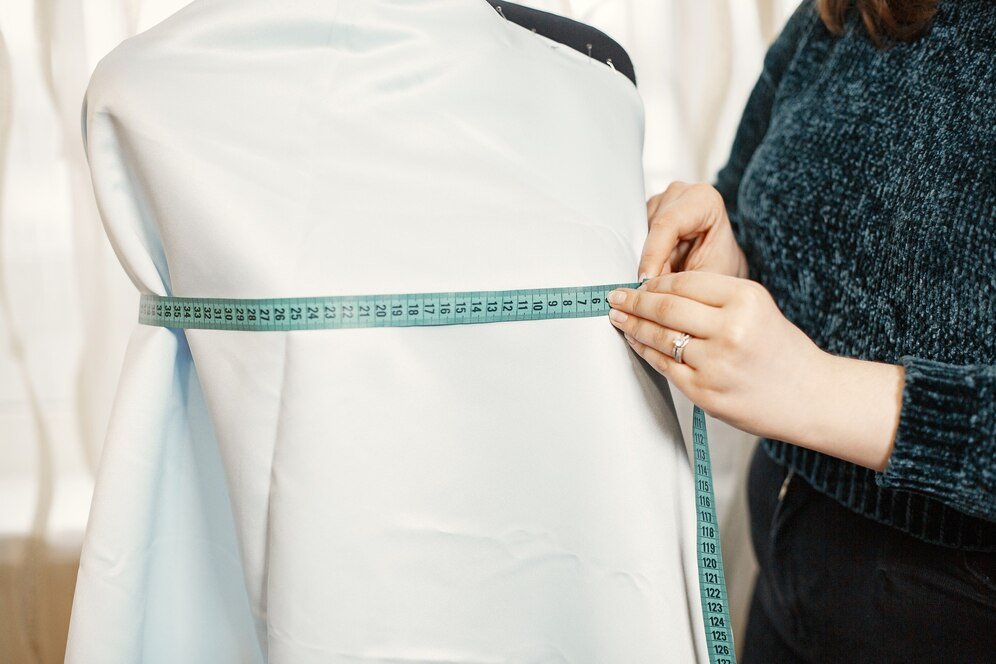
Taking Measurements
Throughout your career, you will find yourself taking measurements often, so you should familiarise yourself with the common areas on the body that you will be measuring. The measurement that you take will help you determine how much fabric you will need for your designs.
As you advance in your career and find your niche, you may choose to enter specialised design fields, so you will need to know all measurements like the back of your hand.
Important measurements:
Neck girth - The measurement around the base of the neckline is referred to as the neckline. This is important to determine collar and shirt size.
Shoulder length - The shoulder length is determined by measuring the area from neckline to the shoulder bone.
Top bust girth - In a horizontal line, you will measure around the body, under the arm, and above the bust to get the top bust girth measurement.
Bust girth - This measurement is taken in a horizontal line at the fullest part of the bust line.
Under bust girth -The under bust girth is taken under the ribs in a horizontal line.
Waist girth -The waist circumference is taken at the narrowest part of the waistline.
High hip girth -The high hip measurement is measured eight to 10 centimetres below the waistline and around the abdomen.
Hip girth -The hip girth measurement is taken around the fullest part of the hip.
Arm length - When measuring an arm length, the arm should be slightly bent, then you will measure that area from the shoulder past the elbow, to the wrist.
Front length - A front length is measured from the neckline/shoulder cross point, past the nipple, and down to the waistline.
Back length - The back length stretches from the nape of the neck to the waistline.
Waist to hip - The distance between the fullest point of the hip line and the natural waistline is measured here.
Waist to knee - This measurement will calculate the distance between the natural waistline and the knee.
Outside leg/Inside leg - You will need to measure the outside and the inside leg when you are fitting for garments. One measurement represents the distance from the waistline to the outside ankle and the other measures the inside ankle.
Bicep - This is a measurement of the top of the arm.
Elbow - The elbow measurement covers the width of the elbow
Wrist girth - The wrist girth measures the width of the wrist.
Activity 2
Estimated Time: 10-15 minutes
If you are entering the field of fashion as a maths whiz, then you should have no problem with many of the measuring tasks you will take on. However, many creative minds sometimes struggle with maths. Either way, it is important to get some practice in because you will be doing these things often and one wrong measurement can be catastrophic.
So, in this activity you will need a measuring tape for fashion design. Next, you should practise taking each of the measurements that you learned in this course. You can practise on yourself or another person. Take your time to ensure you are taking accurate measurements and differentiating between the different bust, hip and leg measurements.
6.7 Collars, Cuts and Pockets

When you are cutting patterns, you have a variety of different collar and cut options to enhance your designs. The collar is a design feature that attaches to the neckline of a garment and changes the way the garment appears.
There are three basic methods of construction for collars:
The first method is a right-angle construction, which is used for shirt collars, stand-up collars, and small flat collars.
The next method joins the front and back bodice shoulders together to construct a collar directly on top of a bodice block.
Finally, the lapel collar construction is extended from the centre point towards the shoulder, as shown in shawl collars. Using one of these three methods of construction, a variety of collars are constructed.
Basic Collar Construction Methods
Popular types of collars:
Right angle construction collars
Stand-up/mandarin collars
Flat collars
Shirt Collars
Button-down collars
Tailored collar
Pockets
Adding pockets to your garment can define the style of your apparel and serve a functional purpose as well. Pockets come in two categories; firstly, set-in pockets, which place the pocket on the inside of the clothing. Alternatively, the second category places pockets on the outside of the garment. These are called patch pockets.
When you are designing pockets, remember they should be functional, so try to make them large enough for a hand to fit into. Also, the positioning of a pocket is an important factor to keep in mind, and it should be easy to access.
MODULE SUMMARY
This module was written to prepare you to cut and grade your own design patterns. You began by learning how to source fabric suppliers, and the many different options you have available to you.You also learned about fabric and trim storyboards, which is the next step after sourcing the materials you need for your designs.
You should have also learned about pattern making, starting with the tools you will need, marking the block, and dart manipulation. The module also covered sizing, grading, and measurements. Additionally, you learned how to take common measurements like the bust, hip, and waistlines. Finally, this module taught you how to add collars, cuts, and pockets to your patterns, which will help you to add finishing touches to your designs. As you continue to the next module, you will continue to work on your pattern and learn some sewing skills to prepare your garment for production.
.svg)