
18.1 Introduction
Learning to work with Excel is a critical component of success in the workplace.

In this module, users will learn to enter, edit and delete data in cells and also learn how to manipulate rows, columns and cells for better clarity and display. You will also learn how to protect your worksheets and hide data as well as learn shortcuts to moving quickly up, down and across the screen.
Before learning the actual tips and tricks of using Excel, here is a closer look at the importance of Excel and what makes it such a versatile tool for offices:
1. The new ribbon interface in Excel allows easy creation and manipulation of spreadsheets. Even without in-depth knowledge or intuitive navigation, users still get the opportunity to create straightforward spreadsheets.
2. Excel offers unique features that allow users to create graphical and visual representations of data. Excel now has improved versions of charts, pivoted charts and designs. In addition, users can avail of the 'miniature charts' and 'sparklines' in order to get a quick overview.
3. Users can perform analysis of a large amount of data using Excel features. In fact, you can actually sort, summarize and filter data extending for thousands of rows and multiple columns.
4. Performing what-if analysis for improved decision-making. What-if analysis is a crucial component for predicting outcomes and making decisions based on probable scenarios. The pivot tables, what-if feature and data tables help project figures and discuss hypothetical situations. Marketing and production management teams depend on finance to analyse past data, which is then used to prepare future sales plans and target figures.
5. Seamless integration with other applications like Microsoft Office makes Excel a versatile and flexible tool. You also have the option of using Excel with cloud computing applications, which can be shared with colleagues. In addition, Excel can be easily accessed and used from other devices such as Smartphones and Tablets.
Each Excel worksheet is a 2-dimensional grid that has columns and rows. Rows are numbered with numerical values starting with 1 while columns are named alphabetically starting from the letter A. A1, B1, C1 and so forth are the cells in the first row. These are referred to as cell names or cell references and are used to identify the location of a cell. These are used when you create a maths formula or similar function. Adding the contents of B4 and B5 together would use this formula B4+B5.
Name boxes are located in the area above the Column A and will display the selected cell - this is the one you have clicked and where the cursor will be resting at that moment. A formula bar displays all contents of a selected cell. A workbook is a full collection or part of your worksheets and spreadsheets. When you open the Excel program, a workbook will be opened with 3 blank worksheets. The name of each will be displayed on a tab at the bottom of your Excel window.
18.2 How to Move from Cell to Cell
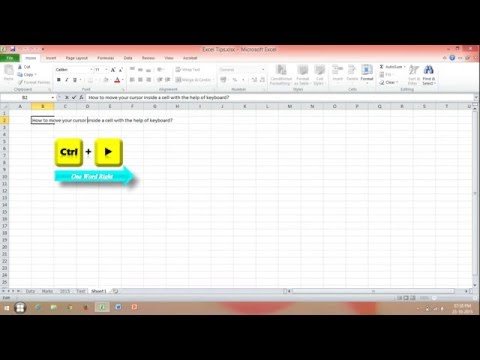
Arrow keys help you move up, down, right and left from cell to cell.
Press the 'Enter' key to move immediately to the cell below the one you have selected. Press the Tab key to move one cell to the right.
Moving from Cell to Cell
18.3 Opening Excel Files in Bulk
Opening multiple files one by one can be a time-consuming task.
You can open several files together by selecting all the files and then pressing enter. You will find that all the selected files open simultaneously.
Opening Files in Bulk
Activity 1 - Practise Using Microsoft Excel
Estimated time: 10-15 minutes
In previous modules, you learned about Outlook and Word, which are two programs within Microsoft Office. You will utilise both programs in your career as a personal assistant as they are great organisational tools. This module is all about Microsoft Excel, another program within Microsoft Office.
Excel is a popular spreadsheet building tool that will be useful for budgeting, planning and accounting in the office. To practise the skills you have learned, open a new Excel spreadsheet and select a single cell. How can you go about doing this? Now you can enter the data, how do you type text into a cell?
18.4 Switching Between Multiple Excel Files
When you have multiple Excel files open, it can be extremely frustrating to find yourself working on the wrong file.
To avoid this, use CTRL + Tab to move between Excel files easily.
Switching Between Files
18.5 How to Insert a Diagonal Line in a Cell
You sometimes need a diagonal line in a cell to separate different types of data, for example, row and column data.
While Home - Font - Borders is the well-known command for changing borders and border colours, you can also click on 'MORE BORDERS'.
Inserting a Diagonal Line
18.6 How to Select Cells
There are several different ways you can select cells in the Excel spreadsheet.
. To select one cell, click in the cell.
. To select one or more rows, click the row numbers.
. If you need to select one column or a number of columns, simply click the column letters.
To select a group of continuous cells, click a corner cell and press down the mouse button. After this, drag your cursor either up or across all the cells that you wish to choose, this will then cause the selected cells to be outlined in black. In order to select multiple cells that are not continuous, press and hold the Ctrl button and click all of your desired cells.
If you need to select every cell on the worksheet, click in the left corner at the top of the worksheet that is next to A.
Selecting Cells
18.7 Entering Data into Cells
Enter data into cells by clicking a cell and then begin to type.
The text that you type will display itself in the formula bar. When you enter dates, Excel will use the current year as default (if you do not enter one manually). When you finish editing the cell, simply press the Enter key or click another cell. To directly edit a cell, double click it or select the cell and press the F2 key.
Every cell has a specific format. This format tells Excel how data inside each cell should be displayed on your screen and in the file.
Entering Data in a Cell
18.8 Propagate Cell Contents
There are multiple ways to fill in data from one cell to the one next to it. These shortcuts help you fill to the left or right.
To fill in content from a cell above, select your cell with data and also the cells you want to be filled in. Press Ctrl and D to fill the cells in a column. If you want to fill adjacent cells with content to the left, select a cell with data and the other cells you wish to fill, press Ctrl and R to fill every selected cell to the right.
If you wish to propagate in any direction you can use the 'Fill' Handle. Click a cell with data that is to be copied, move your cursor over the cell lower right corner until it changes to a plus icon (+) or dark square. Then simply drag it up, down, left or right to fill cells.
If data is to be copied as a date, time or number, be custom-made or other, then the data is incremented by one - not just copied when you use the Fill Handle function. For example, to display the months of the year in column A, type Jan into cell A1, drag your Fill Handle down to cell A12 and all of your months will be displayed in chronological order.
Propagating Cell Contents
18.9 Moving or Copying Cells
In order to move cell contents, you need to right-click a selected cell then click 'Cut'.
To copy the cell contents, simply click 'COPY'. Right-click in a new location and then paste. If you want to paste a group of cells, right-click in the cell where the top left cell of the group is, then select 'Paste'. Remove the animated border around cells by pressing 'ESC' key or simply type content onto a new cell.
18.10 Add or Delete Rows and Columns
If you want to insert a new row in a spreadsheet, right click on a row then click 'INSERT'.
Excel inserts a row above the row that you have clicked on. If you need to delete a row, then right click on the row number and simply select 'DELETE'.
Add/Delete a Row
Add/Delete a Column
18.11 How to Delete Blank Cells
Blank cells may require to be deleted, especially when you are calculating average values across cells, etc.
The best way to delete blank cells is to filter out the cells and then delete them with a single click. First, choose the column that you want to delete. Then go to 'DATA' and then 'FILTER'; after this click on the drop-down list and undo the 'SELECT ALL' button. Select the last option, which is 'Blanks'. This will immediately reveal all the blank cells in the current spreadsheet.
Now go to Home and click 'DELETE' and all the blank cells will get deleted.
Deleting Blank Cells
18.12 How to Institute a 'Vague' Search with Wild Card
Users sometimes need a vague search, especially when they are not sure about the target results that should show up.
There are two wild cards in Excel that help create a vague search. These are the question mark (?) and the asterisk (*).The question mark is used to institute a vague search for one character while the asterisk is used to institute a search for multiple characters. If you wish to use them to create a targeted search, then remember to use a 'wave-line' in front of the two characters together.
Instituting a Vague Search
18.13 How to Generate a Unique Value in a Column
Most users are aware of the filter function, but the 'Advanced Filter' function helps extract a unique value of data from a column.
Click to use the column that you want and then go to Data - Advanced. A pop-up window will emerge from which you need to click on 'Copy to another location'. Then specify the target copying-in area by selecting the button for choosing area. Choose only unique records before finally selecting the 'OK' button.
Generating Unique Values
18.14 Protecting your Worksheet or Workbook
To protect your worksheet in versions Excel 2007 and onward, click on the 'REVIEW' tab and then navigate to 'Protect Worksheet' or 'Workbook' and then press 'OK'.
You also have the option to enter a password if you need to. In the event that the worksheet or workbook is already protected, you can use the REVIEW tab and select 'Unprotect Worksheet' or 'Unprotect Workbook'.
In earlier versions of Excel, you have to go to Tools menu and click on Protection (select protect worksheet or workbook, then click OK). You can also enter a password for this. Never use a password unless fully necessary, as if you forget it you will not be able to unprotect the worksheet, meaning you cannot change date, delete or format any locked cells. In short, the worksheet will become inaccessible to you.
For faster navigation in any direction, use the CTRL button with any of the arrow keys. For example, CTRL + left arrow will take you to the left edge of the spreadsheet.
Protecting a Worksheet/Workbook
18.15 Tips to Transpose Data from Columns to Rows
Users may sometimes like to create a better display and improved clarity by transposing data in columns to rows.
Retyping the data is a time-consuming and tedious option. What you can do instead is to use the 'transpose' function in 'paste'. Begin with copying the area that you wish to transpose and move the pointer to a blank location. Now use 'HOME'-> 'PASTE'-> 'Transpose' to activate the function. You may wish to bear in mind that the transpose function works only when you copy the data first.
Transposing Data
Activity 2 - Practise with Worksheets
Estimated time: 10-15 minutes
Microsoft Excel has a bit of a learning curve and requires some practise to understand. Hopefully, in the first activity, you were able to learn how to enter data into cells and open new spreadsheets.
In this next activity, you will step it up a notch and practise working on spreadsheets. To do this, you need to open Microsoft Excel and navigate to a new spreadsheet. At the bottom, you will find tabs, which are your worksheets. Practise viewing, renaming and deleting them. Next, work on copying and moving worksheets within Excel.
18.16 Working on Spreadsheets
How to view, rename, insert and delete worksheets
Worksheet tabs are found in the bottom left of your workbook area. To view each Worksheet click on the tab. If your workbook window is not wide enough to display all tabs, then you can use the arrows at the left of the tabs to navigate right or left. You can also right-click on any arrows and select tab from any list that displays.
If you need to rename a spreadsheet, then right-click the spreadsheet tab. Choose Rename in the context menu and type a new name. Alternatively, double-click a worksheet tab and then type a new name. To insert a worksheet, right-click on the worksheet tab and select Insert from menu. Excel always inserts a spreadsheet to the left side of your current worksheet.
To delete a worksheet simply right-click on the worksheet tab and delete it from the
context menu.
To move Worksheets or Spreadsheets
Some of you may want to place spreadsheets in a different sort order. In order to do this, right-click on the tab of your desired worksheet and click Move or Copy. In this window, click the name of the worksheet that you want inserted before it and click on 'OK'.
When moving a spreadsheet to a new workbook, right-click on the tab of the source spreadsheet and also click 'Move' or 'Copy'. Then click the drop down arrow that is under 'To Book' and select 'New Book'. Excel will then remove the worksheet from the existing workbook and open a new one containing the moved worksheet.
Copy all work you are moving to another workbook so you have a backup copy in the event of an emergency. Only delete your original when the worksheet has been successfully pasted. Remember that cut and paste options are associated with a certain level of risk. For example, if your computer breaks down or loses power between a copy and paste operation, then you may risk losing data.
Moving a Worksheet
Instead of starting from scratch, you can copy, modify then adapt to an already existing worksheet. To do this on the same workbook, right click on the tab of the sourced worksheet and select 'Move' or 'Copy'. In the next window, select the 'Create a COPY' box, then click the name of your spreadsheet that you want inserted before it and click 'OK'.
To copy a worksheet from one workbook to the next one, right-click the top left corner cell to select every cell and click copy. You can open an Excel workbook, find an empty worksheet and right-click the top left corner to select all cells and then click paste! Then return to the first worksheet and press escape to remove the animated border.
Copying Worksheets
Important: Excel error messages always begin with (#). The most common error ##### indicates that a cell is too narrow to display all data. Make the column wider by placing a cursor on the right side of the column heading and drag the specified column edge to the right.
How to Hide Data
You may wish to hide some data, especially when data is confidential in nature or access is restricted. There is the 'HIDE' function, but this function is rather obvious when used - especially when the amount of data is small. Another option is to use the Format cells function.
First select the area of data that you wish to hide and then click on Home->Format->Visibility, then select Hide and Unhide and choose Hide; this will hide the data in the area selected.
Hiding Data
How to Enter Values Beginning with '0'
If you normally input data values that begin with a zero, Excel will automatically delete out the starting 0. However, you do not have to re-formulate the cell in order to remedy this problem. All you need to do is add in a single quote mark (') just ahead of the starting zero.
.svg)