

Summary/What you will learn
* How to prepare hair before you begin styling
* The types of heating tools you should always carry with you
* Various brushes that are useful when styling bridal hair
* Which products you should have with you
* The accessories that make styling hair much easier
1.1 Introduction
Many people avoid styling bridal hair, worried about doing an inadequate job or failing to perform well
under the pressure.
Those are valid fears, as no bride wants to see a mistake made to their hair on their big day. Thankfully, overcoming those concerns is relatively easy. All it takes is knowledge of the tools you need, a guide to the styles your brides love, and a few tips on how to successfully style on the go or at a salon.
This course addresses those fears by providing you with all the information you need to successfully style bridal hair. We begin by addressing the tools and preparation you need to complete before you begin styling, before giving you step-by-step instructions on how to complete some of the most popular and elegant bridal styles. The course ends by providing you with tips and additional advice on
successfully styling bridal hair.
The first module covers the all the preparation work you need to do and the tools you need to gather before you can begin. We include a discussion on the various types of heating tools, brushes and products you should include in your kit. Investing in these products is the best way to complete a bridal style that your client loves.
Fact
An experienced hair stylist in the UK can make up to £20,634 per year.
Source: PayScale UK
1.2 Preparation
Before you begin any style, you should take the time to complete some prep work.
This ensures that the bride's hair is in good shape for styling. Failure to take these steps can ruin the overall look or create one that does not last throughout the night. When it comes to styling bridal hair, remember that your ultimate goal is a long-lasting style. This means never skipping steps or rushing through your prep work.
Wash the Bride's Hair
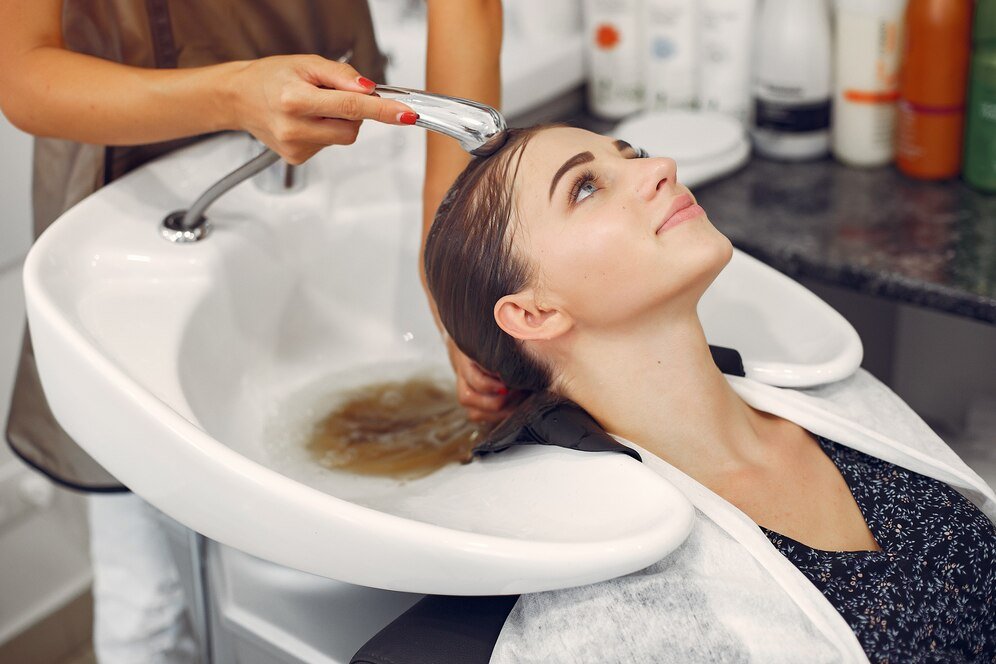
Contrary to what most people believe, dirty hair is not an ideal foundation for an up-do. Freshly, squeaky-clean hair is a bit harder to work with, but it does eventually create a much nicer look. Styles that feature a partial up-door have individual strands framing the face in particular need clean hair to work perfectly. Some stylists ask their brides to wash and dry their hair before meeting with their stylist. This advice is typically given in situations where the stylist needs to save time.
For example
In some cases, brides may request that you wash their hair, as it is part of the overall service. If you have the time, this is a great way to earn some extra goodwill and impress your client. It also guarantees that the hair is clean enough for your style.
1.3 Steps for Washing a Client's Hair
Whenever you wash a client's hair, follow these instructions:
Step One: Start by Using Cold Water
You want your bride's hair to be sleek and shiny for their big day. Rinsing it in cold water before you begin the process works to seal the cuticle, giving you the look you want. Warn the bride ahead of time that the water maybe cold, as this can come as a bit of a shock if it is unexpected. You can use warm water for the rest of the wash. For the cold-water technique to be effective, it only needs to be for half a minute or so at the beginning of the wash.
Step Two: Test the Water
When you switch from cold water to warm water, take the time to test the temperature on your wrist or arm before your client's head. This part can be tricky if you are working out of your client's home, but it is worth the effort. No one wants to burn their client.
Step Three: Measure out the Shampoo
Resist the temptation to use a lot of shampoo. More bubbles do not always result in cleaner hair. Always bring a high-quality shampoo with you when you attend at a bride's house. This ensures you can work with the hair more easily and adds a nice perk for your bride. Measure
out a reasonable amount, given the length and thickness of the bride's hair.
Step Four: Shampooing
Focus most of your time shampooing on the roots and scalp, as these spots tend to hold the most oil, dirt, and sweat. If the bride uses product in their day-to-day life, it can build up in these spots as well. You do not need to focus too much on the ends, but make sure you run them through your shampooed hands at least a few times throughout the process, to clear up any old product or dirt. Take your time massaging the shampoo into the scalp. This helps get hair cleaner and is also relaxing for the client.
Step Five: Rinse
Once you have finished shampooing, you need to be sure you rinse well. If any shampoo remains behind, it can create itchiness, irritation, and makes the hair a bit harder to work with. Some stylists repeat the shampooing process right after the rinse, while others only shampoo once. The method you choose depends on your client's preferences and the state of their hair.
Step Six: Condition
* Conditioning is one of the most important parts of washing hair, as it protects hair from damage and leaves it healthier looking.
*Most stylists take this opportunity to give their brides a thorough scalp massage. This stimulates blood circulation and gives them another chance to relax.
On a bride's wedding day, any stress relief you can bring them is ideal, so spend a bit of time ensuring you massage their entire scalp. Once you have completed the massage, you can start conditioning. Focus on the ends of the hair, because this is where the most damage occurs. If your bride's hair is naturally oily, you may want to avoid conditioning the scalp, to prevent additional oil from developing.
Step Seven: Rinse
Do not use a leave-in conditioner for bridal hair unless your bride insists. These conditioners can make it harder to work with hair or can cause a style to fall flat faster. Instead, use a high-quality conditioner, and make sure you rinse it out well. It is a good idea to rinse for a few minutes longer than you think you need to be sure you get the entire product out.

1.4 Blow Dry and Smooth
This step sounds like a fairly obvious process, but there are a few tips and tricks you can keep in mind that make styling hair easier and also impress your client.
Use a Microfibre Towel
Donate all your old salon towels to your nearest animal shelter and replace them with microfiber cloth as soon as possible. These towels are perfect for hair and chances are your clients are not familiar with their use. This makes you look like a professional who is ahead of the game. Microfibre cloth towels soak up water fast, reduce frizz, and prevent breakages.
For an added touch, invest in microfibre gloves to gently squeeze out any water by hand rather than using the
towel.
Use the Right Brush
Make sure you choose the right brush for your client's hair. Using the wrong one can break hair, make drying take longer, and irritate the scalp. Clients with long hair need a long-barrelled brush, where as a smaller handle is fine for shorter locks. If your client has thick hair, use boar bristle. Ceramic brushes are perfect for fine hair. We discuss the specific types of brushes best used for bridal hair later in the module.
Never Forget Heat Protection
Protect your bride's hair by using a heat protectant before applying any heating products. This prevents the hair from drying out and breaking, while also reducing frizz and flyaway hairs. We also talk about specific heat protection products later in this module.
Dry from Roots to Tips
Drying the hair from the roots down to the ends speeds up your drying time. It also reduces frizz by ensuring the heat moves in the direction the client's hair falls. Remain patient throughout this process, keeping in mind that longer and thicker hair has a longer drying time. Applying higher heat does not speed up drying times and can increase the risk of breakages while also dulling the hair's shine. Stay patient. Once the hair is dry, focus on making it smooth.
Lay in Place
Before you start styling, be sure you lay the hair in place. This means combing it or brushing it into the position you want it to lie in as you style.
For example
The first hairstyle discussed in this course relies on a side part. As you dry and smooth down your bride's hair, comb into this part, to get a head start on setting the style.
Fact
Ionic hair dryers are the fastest ones available on the market and they damage hair the least.
1.5 Heating Tools
Every hair stylist needs to have numerous heating tools in their arsenal, including multiple curling wands or tongs and a hair dryer.
Make sure you purchase professional or salon quality tools, especially if you plan to style multiple members of the bridal party along with the bride at the same time. Tools designed for individual, at home use cannot handle being on for that long, which can sometimes result in electrical shortages or malfunctioning equipment.
Wands and Tongs
Some stylists carry curling irons instead, but the addition of the clip can be cumbersome and may even make it harder to achieve certain curls. Avoid the frustration by purchasing curling wands and tongs instead. They are a bit harder to get the hang of, but once you master them, they are incredibly useful. Practise on your own hair or a friend's hair for a few nights a week in the month leading up to the wedding to be sure you have mastered the skill.
There are multiple thicknesses available, each one giving a slightly different curl and used for a slightly different purpose.
In general, wands are sold by thicknesses, which is a consistent unit of measurement across brands:
* 2 Inches/5.08 Centimetres: These wands aren't intended for curling hair at all. Instead, they are meant to give the hair a bit of a rounded curl at the bottom or to frame the face. This tool is perfect for brides who want up-dos with sections framing their face but want to avoid ringlet-like curls. It gives a nice voluminous, rounded look.
*1.5 Inches/3.81 Centimetres: A wand with a barrel this size is great for bouncy, loose, beachy curls. When using a wand this size, be
mindful of exactly how loose the resulting curls are. You should spray hair before and after with a light-hold hairspray and be prepared to further set the curls if the hair you are working with is thick.
*1.25 Inches/3.18 Centimetres: This is the most popular size curling wand, tong, and curling iron sold. Most people want curls like the ones created using heating tools this size. If you spray immediately after loosening the curl, the hair winds up with tight, spiral like curls.
Alternatively, you can brush or comb them out, to get looser, more natural looking waves. There are smaller wands and irons sold, which are perfect for those with very curly or textured hair. You should have a range of these smaller ones available, though you may not use them as much. The wands noted above are ideal for the styles discussed in this course.
Hair Dryer
It is important that you have a high-quality hair dryer with you whenever you style hair. Ideally, you should invest in an ionic dryer, which works to dry hair faster without causing more damage. There are other reputable models on the market as well.
When looking for a professional blow dryer, keep the following in mind:
Wattage. Look for a blow dryer with a higher wattage. This gives it more power and results in hair that dries a lot faster. Most people have an 1800 watt one for home use. Salons tend to use dryers with wattages of around 3000, up to 3600. Obviously, the higher the wattage the higher the cost, but it is a worthwhile investment.
Ceramic and Tourmaline: Ceramic technology works to control the dryer's heat distribution, ensuring it iseven. Tourmaline serves to seal the cuticle, locking in moisture and smoothing hair.
Cool Button: Never use the dryer's cool setting when actually drying your client's hair. It does not work fast, nor does it offer any greater protection to the cuticle itself. However, these settings are perfect for setting styles. For example, if you are trying to set a high side part for a Hollywood-glam style, you could pin and spray it into place, and then give it a short blast with the cool feature to encourage the style to set.
Lengthy Cord: It is not safe to connect a hair dryer to an extension cord in the hopes of getting a few morefeet out of its reach. Instead, invest in a hair dryer with a cord that is long enough for your needs. If you arehaving trouble, you may need to re-evaluate your hair styling set up.
Nozzle or No Nozzle
Some people believe that the nozzle attachment to a hair dryer serves no purpose, or that it slows down the process. This could not be further from the truth, so be sure you look for a hair dryer with a nozzle. This particular attachment works to dry hair faster by focusing heat on any given section. It also reduces frizz and fly away hairs making it much easier to smooth the hair down and style it. You may find that you do need to use your dryer without this feature as well. Consequently, make sure it is easy to remove and reattach.
Activity #1: Practise with Wands
Estimated time: 10 to 20 minutes
Once you have purchased a variety of wands, practise using them to get a feel for the style each creates. Start by using the smallest size you have and experimenting with the type of curls it creates.
For example, hold the wand in different directions, use different types of hair spray as you style and brush it with different types of brushes.
Make sure you repeat this process with each wand you own.This familiarises you with the way your tools work, taking a lot of the guesswork out of how to achieve a bride's dream hairstyle.
1.6 Brushes and Combs
Stylists seem to use brushes more than almost any other tool intheir kit, including many products.
Multiple types of brushes are needed to complete a single look. As a result, you need to be sure you have the following brushes in your kit before you start advertising your services. Using the wrong brush can be physically painful for your client and can create a lot of extra work for you.
Tangle Teaser
Tangle teasers, or teasing brushes, are perfect for when you need to create texture or volume, but you do not want literally tease the hair. These brushes separate the strands from one another slightly, creating a thicker look. They are perfect for creating many bridal styles, as you want the hair to be as textured and malleable as possible.
Paddle Brush
Paddle brushes are perfect for clients with long hair, as they are wide and flat, covering a lot of surface area atonce. They are ideal for situations where the hair needs to be smoothed and straightened.
Barrel Brush
A barrel brush is a rounded brush, used to shape the hair when drying. This increases volume. It can also help youshape the hair, giving it more definition in key areas. They are not always recommended when drying hair, especially if the desired style requires tight curls or braids.
Vented Brush
These types of brushes are perfect for drying thin hair, as the holes in them allow for better air flow creating more texture. Again, they are not always required, but if your client does have thin hair or the style you want involves a lot of texture, a vented brush is a good place to start.
Cushioned Brush
If your client has long, thick hair that is prone to tangles, you need to bring a cushioned brush with you. Theycomb out tangles in a gentle way. As far as brushes go, they are the easiest on the scalp.
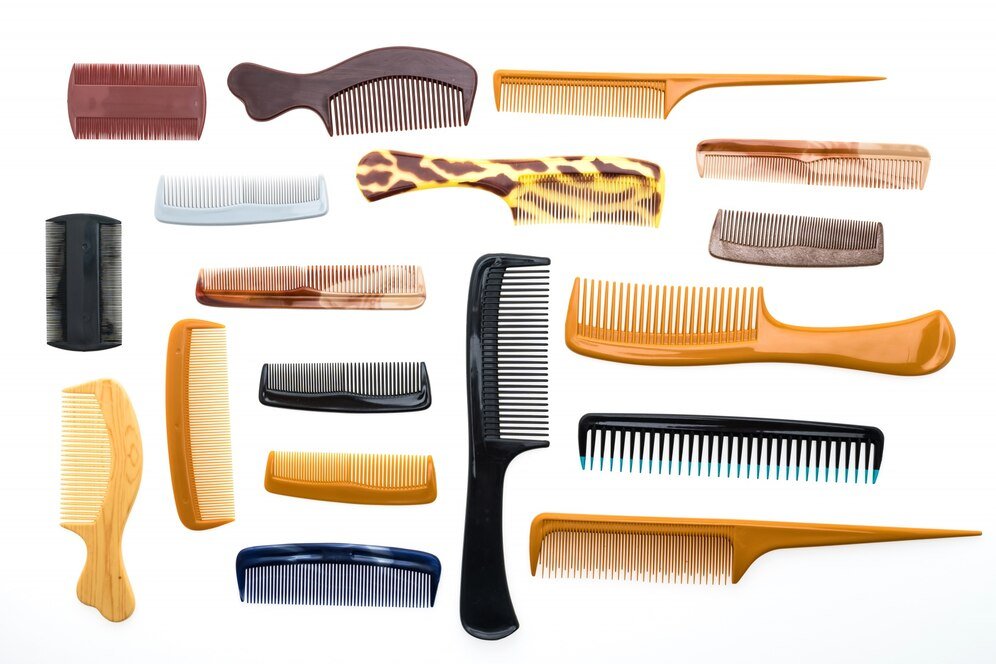
Wide-Toothed Comb
A wide-toothed comb is an essential item for all stylists to have. It can separate curls, brushing them out without destroying or loosening them. These combs are also great for dealing with already-curly hair, as they can give the style some shape and character without ripping through tangles.
Tail Comb
Finally, be sure you have a tail comb. These are often available in plastic or metal; it does not matter which material you choose. These combs are great for curly hair, brushing out small curls, adding small details to a style, and smoothing away frizzy hair.
A Note on Bristles
Ideally, you should have teaser and paddle brushes made with a few different bristle types to accommodate the different type of hair texture you encounter. If this is not possible just yet, you should invest in nylon or porcupine bristles, as they are suited for all hair types.
Animal and nylon bristles add volume and texture to thick hair while also working through any tangles with relative ease. If your client has thin hair, use ionic, boar, or nylon bristles to add depth.
Activity #2: Match Brushes to Your Family's Needs
Estimated time: 10 to 15 minutes
Take some time and make a list of about 10 or so people in your life, whose hair texture you familiar with, such as close friends and family.
Next, write down the type of hair they have (i.e., curly and thick, straight and thin, wavy and thick, etc.). It is okay to guess if you are not
completely sure, since no one sees this exercise but you.
Finally, write down the type of brush that would best suit their needs if they asked you to style their hair.
1.7 Products
Stylists also need to carry with them an array of products, including hairsprays, heat protectors, and oils and serums.
All bridal styles involve at least two or three different products to maintain their hold while still looking stunning.
Being familiar with a few of the most popular types of products used gives you a great place to start when
shopping for your own kit.
Hair Spray
You should have at least two types of hairspray in your kit at all times. One for lighter, more flexible holds. This is the type of spray commonly used before styling, to get encourage hair to hold shape or curls. Flexible sprays also create a touchable texture, so the hair looks natural in wedding photos.
The second type of hair spray you have should be for longer-lasting holds. This type of spray is perfect for sleek looks or for brides with very thick and unresponsive hair. Use these products after the style is completed, as they are not often repositionable.
Heat Protectant
It is incredibly important to protect the bride's hair.
Make sure you use a high-quality heat protectant that is well reviewed. You can often find heat protectors with other components, such as anti-frizz and environmental protection as well. Take the time to shop around. These products prevent the hair from breaking, splitting, or becoming damaged under the heat of your curling wands and hair dryer. Always use a heat protectant before you apply each new heat source. If you are going to be curling and drying the hair repeatedly, look for a heat protectant that is not too oily but that is still effective.
Dry Shampoo
Dry shampoo is another essential tool in your kit. You do not want to use it for its cleansing properties. Instead, stylists use dry shampoo to give hair a bit of natural looking volume without teasing or using strong sprays.
Dry shampoo is perfect for creating texture and for encouraging more dramatic styles, such as high parts, to stay in shape.
This product is specially made for hair colour rather than hair type, so be sure you have both the brunette version and the blonde one. The product does have a slight colour to it when you spray it on the hair, so try to match it to the person's shade as best you can. Use the blonde for lighter redheads and the brunette for those who have more auburn shades.
Mythic Oil
Finally, you should get some mythic oil. Contrary to popular belief, you should never use this oil before heat. It is not a heat protectant. Instead, you apply it after the heat treatment as a way to smooth down frizz and reduce flyaway hairs.
Activity #3: Store Your Products
Estimated time: 10 to 15 minutes
Before you can run out and purchase everything you need, you must have a place to store them either in your home or at your place of work. There are numerous options for product storage, depending on your patience and your budget.
You can always find salon-quality storage items on online marketplaces like Amazon as well as by visiting the supplier directly. Alternatively, you can find storage products at major department stores.
1.8 Accessories
There are a few final touches to your kit you should purchase before you can start offering your services as a bridal hair stylist.
While you can often find these items at pound shops, make sure you invest in a more upscale brand. Even a supermarket version is preferable. Wherever possible, purchase them from the same retailers your local salons use, so you can offer your clients items of a similar quality.
Pins
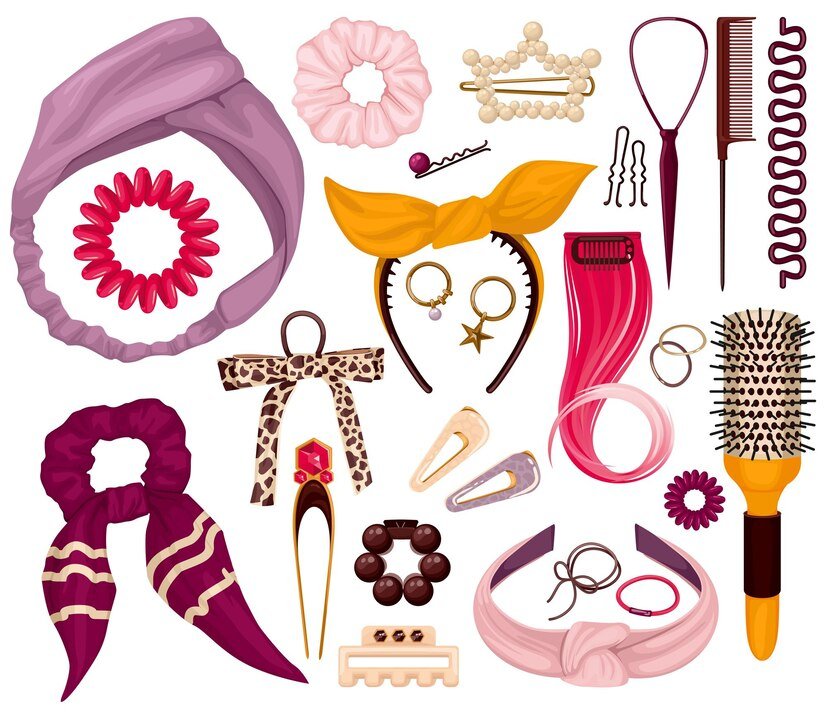
The size of your pin box can be the difference between an up-do that lasts and one that falls flat after the ceremony.
At a minimum, you need the following types of pins:
* Jumbo pins, in both light and dark colours.
* Regular sized pins, in both light and dark colours.
* Mini pins, in both light and dark colours.
* U-shaped hair pins, in both light and dark colours.
* Straight clips and alligator clips for sectioning.
Pins are also available in glossy and matte shades, so be sure you have a well-rounded selection in your pin box.
Hair Claws
You should also have at least two to three hair claws for sectioning off larger pieces of hair when styling. The pins you use typically go home with the client, but these clips remain part of your kit. As a result, you should also carry disinfectant with you to spray these items before and after use.
Module Summary
This is the end of the first module in the bridal hair course, covering the required prep work and tools you should have before you begin styling.
We went into detail discussing the types of heating tools and brushes you need, as well as when to use each one. Next, we talked about the products successful bridal stylists keep in their kits, including specific types as well as their uses and purposes.
Finally, we listed a few accessories you should always make sure you keep stocked.
Make sure you are familiar with all of the terms and tools discussed in this module, as the next one builds on this information. We begin giving you a step-by-step guide to creating a modern, romantic up-do based on old- fashioned Hollywood glam next. This style heavily relies on the products, tools, and accessories we have covered above. If you are practicing as you go through the module, be sure you have the time to gather all the supplies discussed before you begin. Never substitute one product or tool for a recommended one, as it can impact the final look.
.svg)